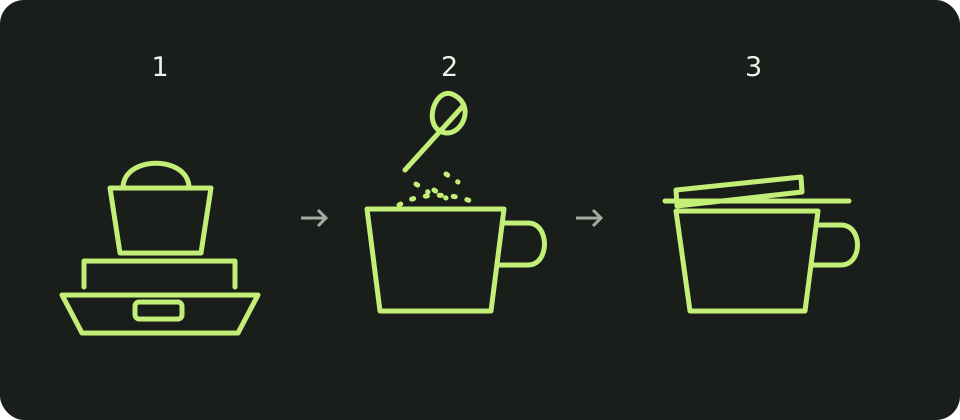
Three flour-measuring steps: weigh on a scale, spoon into a cup, then level off the top.
Original diagram of the methods: weighing in grams, gently filling a cup and levelling it off.

Weigh when the recipe gives grams

Put the container on the scale, select grams and tare. The display returns to zero: you can add flour without including the container’s weight.

For 150 g of flour, stop at 150 g after taring. No need to convert to cups: the scale has already done its share of the work.

Fill gently when the recipe gives cups

Use a dry measuring cup with the capacity specified by the recipe. Spoon in the flour without pressing. Scooping directly from the bag or tapping the cup can pack it: more flour then fits in the same volume.

  1. Check the cup’s capacity and the amount required by the recipe.
  2. Gently stir the flour in its container with a spoon to loosen it.
  3. Spoon flour in until it rises slightly above the rim, without pressing.
  4. Draw a straight edge across the top to remove the excess: this is levelling off.
  5. Use the level measure without adding a little mound of flour.

Understand what a cup of flour represents

The Cookiosity converter uses 120 g per US cup for King Arthur Baking’s all-purpose flour. This reference does not guarantee the weight of your flour or automatically match a specific local type, such as French T55.

Check the vessel too: a 250 ml cup does not hold the same volume as a US cup. A local flour name alone does not establish a match with the flour in an American recipe.

What weights do the sources give for a cup?

Here are the references published by King Arthur Baking and Sally’s Baking for all-purpose flour, with their respective contexts.

Three published values and their context
Filling contextMass per cupSource
Flour loosened, spooned in and levelled offAbout 120 gKing Arthur Baking
Spooned in and levelled off, the author’s reference125 gSally’s Baking
More densely packed flourCan reach 160 gKing Arthur Baking

These references do not come from one series of weighings. The high value cited for more densely packed flour is not a universal maximum.

Why do these references differ?

More tightly packed flour leaves less air between the particles, so more fits in the same volume. Levelling smooths the top but does not undo packing.

The 5 g difference between the two references does not isolate its cause. Averaging them would not give a value representing all flours.

The high value in the table does not automatically mean scooping directly or tapping a specific number of times. It is not a weight to aim for at every measure.

Which value should you use for your recipe?

Follow the recipe’s weight when provided. Otherwise, look for its author’s cup convention and filling method rather than adopting another website’s reference.

The converter uses King Arthur Baking’s reference. The table’s other values explain conversion limits; they are not extra calculator settings. To change servings, start from known amounts without repeatedly converting the same measure.

Keep the useful method close at hand

The flour is measured: return to the recipe and prepare the next steps before heating.

Sources for this page

An ingredient to hand, a question in mind

Search for a recipe, ingredient or kitchen skill

26 pages found

Guide

Cooking with a dog at home: a safer kitchen

Cooking with a dog takes a little planning: keep walkways clear, put food and waste out of reach, and prepare a quiet place where your dog can rest.

Guide

3D-printed kitchen storage: measure before printing

Plan 3D-printed kitchen storage to fit your drawer and its contents: check internal dimensions, room for your hands and a mock-up before you start printing.

Guide

Measuring flour: why the weight of a cup varies

A cup of flour can have different weights. Compare the references of 120 g, 125 g and up to 160 g, along with their methods and limits.

Recipe

Carrot and red lentil soup: choose your texture

Make carrot and red lentil soup for four with a gentle simmer, tender vegetables and water added at the end to give the soup the texture you prefer.

Recipe

Tomato and chickpea pasta: coat every piece

Make tomato and chickpea pasta for four, coordinate the cooking and loosen the sauce with a little pasta water just before bringing it to the table.

Recipe

Roast potatoes: even pieces and a golden finish

For oven-roasted potatoes, cut even-sized pieces, leave room on the tray and check the centre as well as the colour before serving this side dish.

Recipe

Apple crumble: tender fruit and golden crumbs

Make apple crumble for four with small pieces of fruit, a topping kept in loose crumbs and a planned resting time before bringing dessert to the table.

Ingredient

Carrot: match the cut to the dish

Prepare carrots to suit the dish: rounds for soup, dice for sauce or sticks as a side, with practical pointers for checking their texture during cooking.

Ingredient

Red lentils: cook for a soft, thick soup

Learn to cook red lentils in soup: rinse them, keep an eye on the liquid, adjust the final texture and understand why other pulses are not a direct swap.

Ingredient

Chickpeas: dried weight and drained weight differ

When cooking chickpeas, distinguish dried, net and drained weights, then prepare the right product for your sauce and the amount the recipe calls for.

Ingredient

Apple: choose the cut and texture for dessert

Prepare apples for dessert by weighing at the right stage, choosing the size of the pieces and watching how the variety and baking dish affect texture.

Utensil

Chef’s knife: set up a steady board and controlled cut

Use a chef’s knife with a steady board and a controlled grip, then learn about careful cleaning and storage, without a commercial product comparison.

Utensil

Saucepan: leave room to cook and stir

Choose a saucepan with room to stir, a base suited to the hob and heating and cleaning instructions specific to your model before starting the recipe.

Guide

Soften an onion: cook gently without burning

To soften an onion, prepare what comes next before heating, watch the colour and adjust the heat before adding garlic, tomatoes or the recipe’s liquid.

Guide

Plan your preparation: cook in a useful order

Plan your cooking by reading the recipe, weighing and cutting before heating, then preparing a clean workspace and containers for managing leftovers.

Ingredient

Onion: choose, slice and prepare for the hob

Choose a storage onion, distinguish slices from small dice and prepare the required amount and the next ingredients before heating your saucepan.

Ingredient

Potato: sort and cut before roasting

Before roasting potatoes, sort the tubers, check the weight before peeling and cut similar-sized pieces on a steady board, ready for the oven tray.

Utensil

Frying pan: choose the useful base and cooking surface

When choosing a frying pan, check the usable base, side height and food-contact surface, then follow the model’s instructions for cooking and care.

Material

Stainless steel: understand the pan before use

Understand stainless steel cookware: the food-contact surface, base construction, hob compatibility and maintenance need checking for each utensil.

Material

Enamelled cast iron: identify and protect the surface

With enamelled cast iron, distinguish enamel from seasoning, heat according to the instructions and protect the inner surface during cooking and cleaning.

Material

PTFE non-stick: prevent overheating and surface wear

Identify a PTFE non-stick coating, avoid heating an empty pan and use suitable cooking and cleaning methods while keeping the different risks in perspective.

Guide

Slice an onion: make even half-moon slices

To slice an onion, rest each half flat, work at your own pace and prepare the next ingredients before heating, without trying to match a demonstration’s speed.

Tools

Kitchen converter: grams, ml and US cups

Convert grams, ml and US cups for six ingredients. Check the quarter-cup reference values and choose the right units before measuring your ingredients.

Tools

Adjust the proportions of your own recipe

Adjust your recipe for the servings you want or an ingredient you have: enter a base, then calculate the quantities while keeping their original units.

Tools

Switch between Celsius and Fahrenheit for the oven

Convert an oven temperature between Celsius and Fahrenheit, from 0 to 350 °C, using the exact formula and without automatic adjustments for fan cooking.

Tools

Scale a recipe for a round or square baking pan

Compare the base areas of two pans and adjust the ingredient amounts to keep the batter about the same depth.